Get dynamic secret variables in VSCode's Thunder client from Hashicorp Vault
Thunder Client is a plugin for VSCode which has become my daily driver. Unfortunately, you can't avoid tokens or passwords in productive use, which - if lost - can trigger a super disaster.
Together with a Hashicorp Vault instance as Secret Manager it is possible to generate dynamic Secrets that are written to the environment only when needed.
The advantage is also that in case of a breach you can easily create new secrets via Hashicorp Vault without having to change anything in the client configuration.
Local enviroments in Thunder Client are problematic
Like almost all API clients, the Thunder client uses two environments: one for public data, which can also arrive in a Git repository, and one private, which is stored only on the local client.
Unfortunately, this is the crux, because the data is available locally as plaintext and stored persistently
The default path under Linux is e.g. ~/.config/Code/User/globalStorage/rangav.vscode-thunder-client.
An attacker does not have to make a special effort to grab all API secrets.
Although the Thunder Client is one of the few to offer the possibility to use environment variables, nobody wants to maintain all environment variables manually on all devices all the time. And what happens if one of them changes?
What you will need
- Hashicorp Vault instance with LDAP or userpass authentication (without second factor). You don't need more than read permissions on the Vault.
- User name and password are initiated via OS environment variables: On Linux and MacOS you set an environment variable via e.g. export USER=USERXY . On Windows OS it is as usual more complicated but also feasible.
- You should already know a little bit how to use the Thunder client.
Environment variables that must be set beforehand
The VaultUser, the VaultPassword of this user, and the VaultAddress must be set in advance via environment variables. We explicitly set environment variables at the operating system level, not in the Thunderclient.
The required variables are:
- osvaultuser
- osvaultpassword
- vaultaddress
Temporary secrets with Hashicorp Vault
The method I show works using the request chain from the Thunder client.
If you don't know what this is: Here other API requests are set before the actual API request. This execution creates a minimal overhead, which is however to be gotten over.
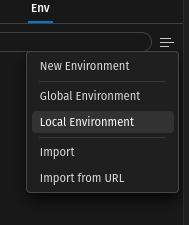
Create local env
Open Visual Studio Code with Thunder Client and create a new empty local env file:
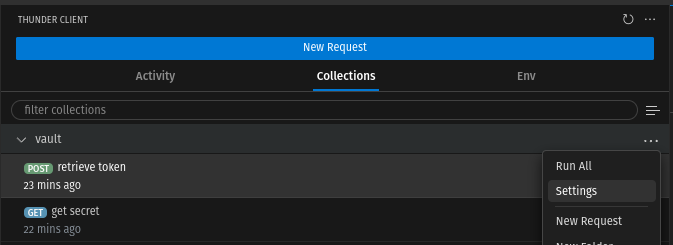
Create collection vault with requests
Now switch to the Collections tab and create a new one with any name, e.g. "vault" and your first request
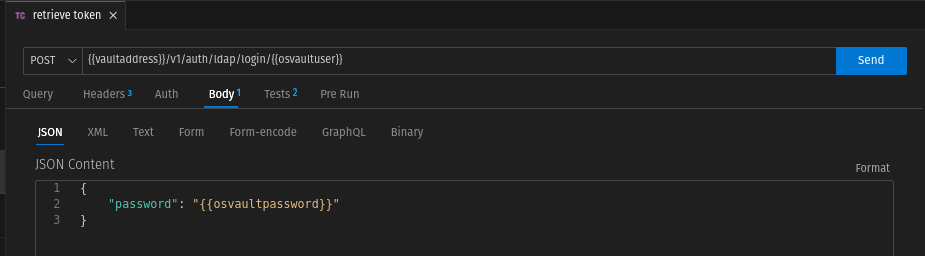
retrieve token
First, we need a token, which we can generate either via a userpass user or an LDAP user. To do this, we send a POST request to the Vault.
The POST request goes for Userpass to:
https://{{vaultaddress}}/v1/auth/userpass/login/{osvaultuser}}for LDAP:
https://{{vaultaddress}}/v1/auth/ldap/login/{{osvaultuser}}Leave query, headers and auth unchanged. In the body, we add the following JSON string for authentication in the Vault:
{
    "password": "{{osvaultpassword}}"
}
The vault token is in the reponse in auth.client_token. We write this token in the local variable "currentVaulttoken" in the tests tab.
To prevent the value from being publicly accessible, we explicitly set the scope local (currentVaulttoken, local)
For safety we also check if we get a HTTP reponse code 200. We have thus the following

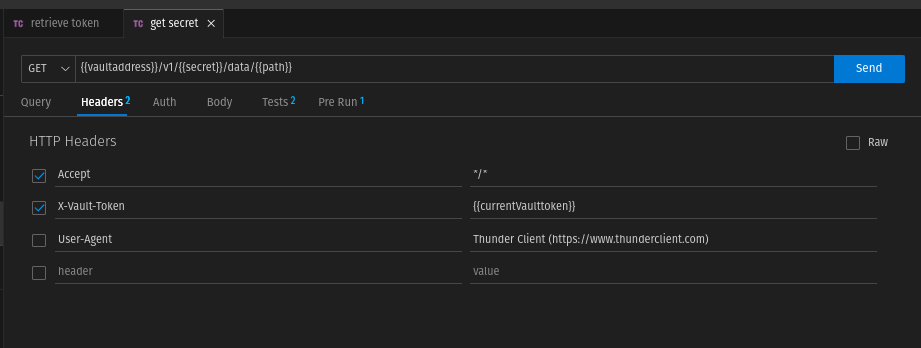
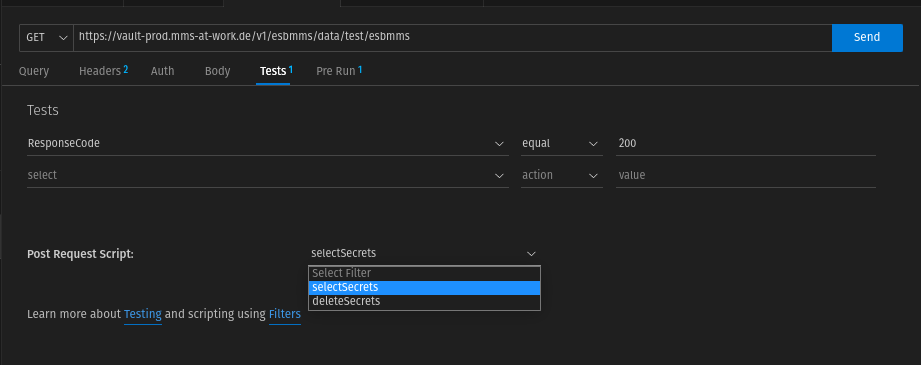
get secret
We create a new GET request with the name "get secret".
Here we cannot leave the header unchanged, but have to set the value currentVaulttoken, which we will get from the previous request as "X-Vault-Token".
The request returns a JSON string as response. The data.data field contains all the secrets that we write to the local variable secrets.
The request returns a JSON string as response. The data.data field contains all the secrets that we want to write to the local variable secrets. For this we need to create a test.
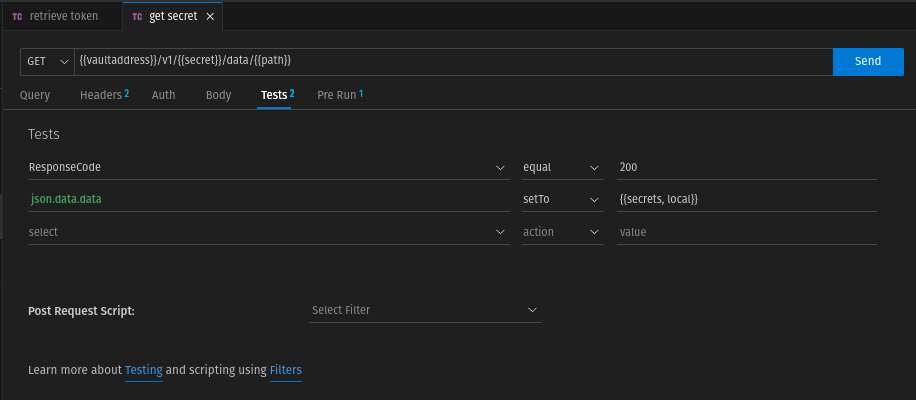
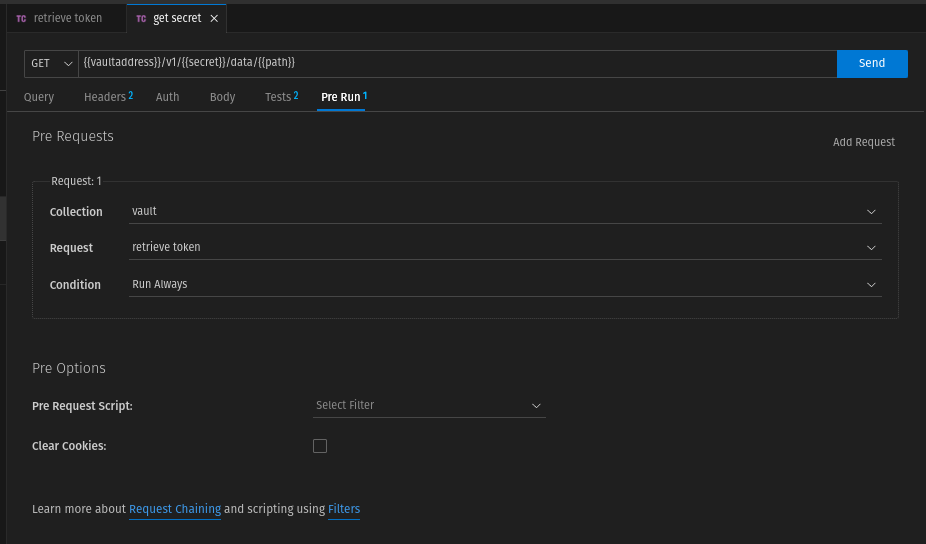
Since a token is to be retrieved first before this request, we must chain this request with "retrieve token" as predecessor. We do this in the "Pre Run" tab.
custom script
Before we come to the last request, we need to create a custom filter. Don't worry, this is just copy and paste work in this case.
Create the file secrets.js in an appropriate location and insert the following code:
/**
 * Selects secrets from the input.
 *
 * @param {any} input - The input parameter.
 */
function selectSecrets(input) {
    console.log("running selectSecrets");
    var secretValue = tc.getVar("secrets");

    if (typeof secretValue === "object" && secretValue !== null && secretValue != "") {
      // If secretValue is already an object
      for (const key in secretValue) {
        const keyName = key;
        const value = secretValue[key];
        tc.setVar(keyName, value, "local");
      }
    } else {
      try {
        // Parse secretValue as a JSON object
        var secretObject = JSON.parse(secretValue);

        // Iterate over the key-value pairs of the secretObject
        for (const key in secretObject) {
          const keyName = key;
          const value = secretObject[key];
          tc.setVar(keyName, value, "local");
        }
      } catch (error) {
        console.error("Error while processing secretValue:", error);
      }
    }
  }

  function deleteSecrets(input) {
    console.log("running deleteSecrets");
    var secretValue = tc.getVar("secrets");

    if (typeof secretValue === "object" && secretValue !== null && secretValue != "") {
      // If secretValue is already an object
      for (const key in secretValue) {
        const keyName = key;
        const value = secretValue[key];
        tc.setVar(keyName, "", "local");
      }

    } else {
      try {
        // Parse secretValue as a JSON object
        var secretObject = JSON.parse(secretValue);

        // Iterate over the key-value pairs of the secretObject
        for (const key in secretObject) {
          const keyName = key;
          const value = secretObject[key];


          tc.setVar(keyName, "", "local");

        }
      } catch (error) {
        console.error("Error while processing secretValue:", error);
      }
    }
    tc.setVar("secrets", "", "local");
    tc.setVar("currentVaulttoken", "", "local");
  }

module.exports = [selectSecrets, deleteSecrets];This filter does the following:
- selectSecrets reads the JSON array "secrets" in the local env file and writes all key values from the Hashicorp Vault to a local enviroment file.
- deleteSecrets overwrites all values with an empty string.
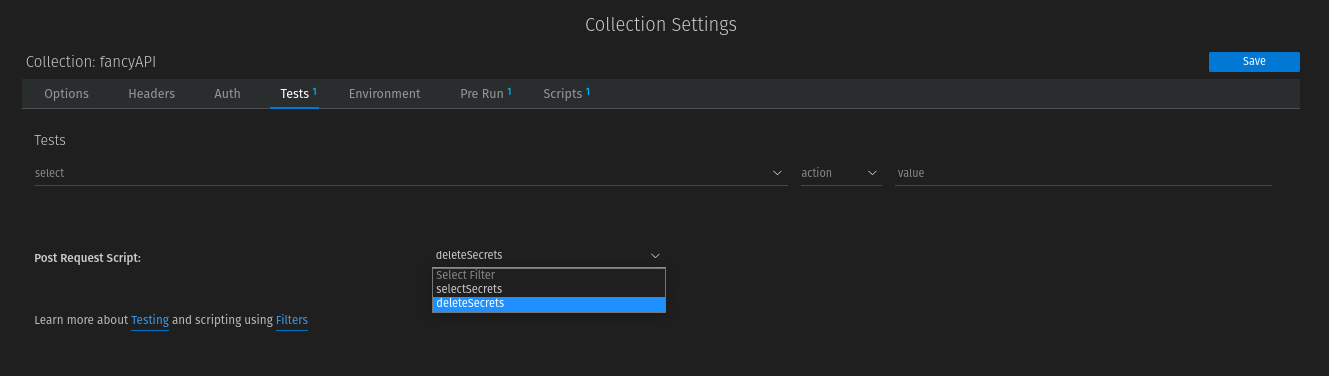
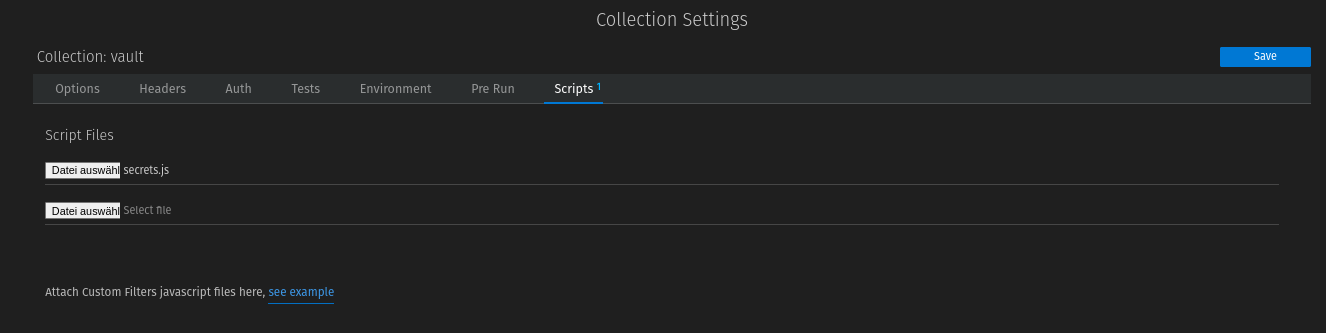
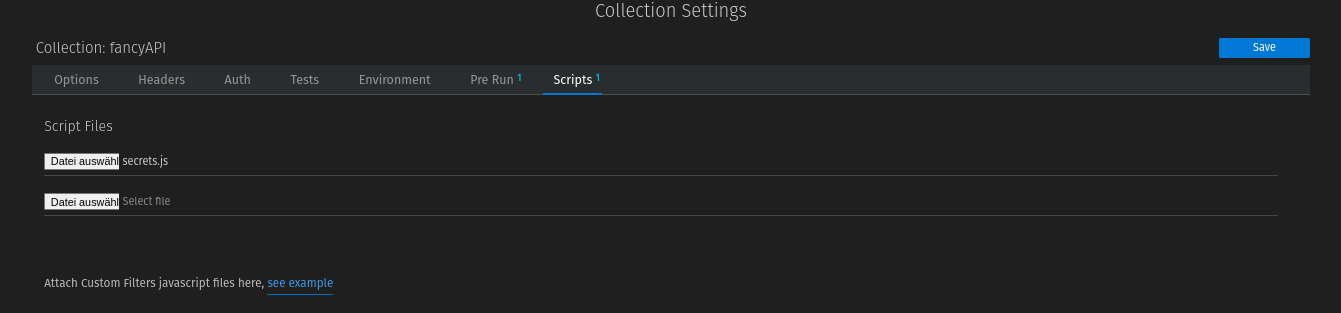
Then switch to the Collection Settings (we had called our Collection vault) and add the custom script:
Switch to "Scripts" and secrets.js to Script Files. Don't forget to save.
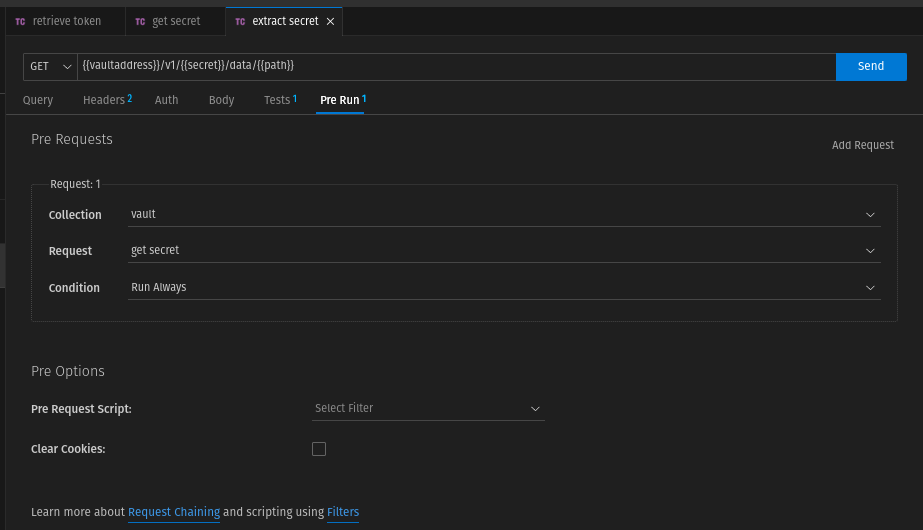
extract secret
If you have tried the previous requests, you will notice that the secrets from the vault are written in a JSON array. However, we want the key-value pairs to be taken as they are in the vault. This is what the last request and script is for.
We use exactly the same GET request as for "get secret".
The Headers tab remains the same.
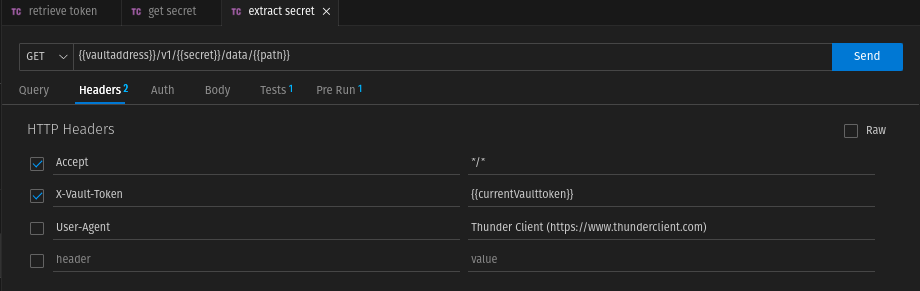
In the "Pre Run" tab, we concatenate the request with "get secret".
No got to Body tab remove the writing of json.data.data into the local secrets variable and the custom "Post Request Script" selectSecrets.
Why is an extra request necessary at all? Due to the asynchronous nature of the requests, it might be that the variable is not present at the time of script execution.
Usage in practice
Each request from another collection must be concatenated with the last request from the collection "vault" to get the secrets.
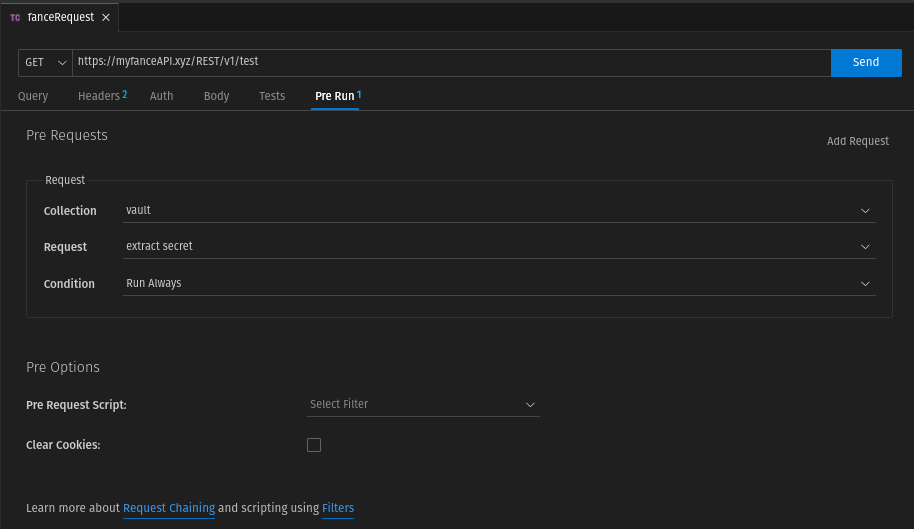
To avoid having to configure this individually for each request in a collection outside the vault collection, you can set this concatenation as a precondition in the collection settings.

The script also offers the possibility to remove the extracted secrets. But for this you have to import the script for each collection.
To use the delete function automatically, you can then simply run a test after each request that uses the "deleteSecrets" function from the script.